12/15/07

Camper Mod: Sewer Hose Storage

I was not happy with the short Sewer Hose Storage pipes that you get at CampingWorld. These are smaller in diameter and shorter in length. I was looking for something that stores the x-tra long hose and the additional accessories.

1) Pipe Connection to Travel Trailer, used flex band to bend around the pipe. This end is caped off but not glued. I used screws in case i ever need to open this on this side.


2) This side has a threaded cap which I secured with a string.


3)Another view

Camper Mod: BackUp Camera - Ready to Roll

1) Camera is housed in a PVC pipe. The white piece is removable and has the the camera screwed into. The reason for this is to be able to remove the camera and to adjust the tilt of the horizon if necessary.


2) PVC pipe is sprayed black and attached to the tire carrier.


3) Now we have a perfect view on the street behind the travel trailer.

Camper Mod: BackUp Camera - Hooking Up

1) The camera is positioned to monitor the Hitch Ball.


2) Visible Hitch Ball on Touch Screen


3) Hook Up to Travel Trailer - still way off


4) Hook Up to Travel Trailer - right there without any help on the first attempt.

Camper Mod: BackUp Camera - Cable

This is the cable connection between the Truck and the Travel Trailer.

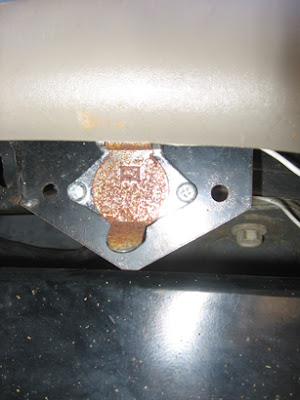
1) Receiver Plug on Truck


2) Cable Connection - Black = Standard & Silver = Video Feed


3) 4 Pin connection (Power from Car to Camera +/-, Video 2x)

Truck_Puter Update

Here are some latest pictures on the system as it works in the Truck:
1) Windows XP


2) Skin in the MP3 Player matches the decor of the Truck.


3) Close Up on the MP3 Player (FrodoPlayer, se other posts in here)


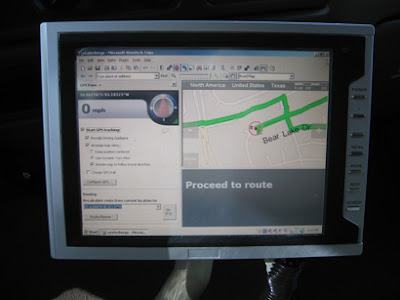
4) Microsoft Trips & Streets on Touch Screen

12/14/07

Camp Food: Turkey

Here is a brief review of our recent Thanks Giving Turkey Feast - Sommerville, TX:

1) get some heat going, place enough coal to last for 4 hours.

2) After filling in some water wrap the the Turkey Tray in Alloy Foil:

3) Then wrap the whole grill with foil to keep the heat in:

4) Wait 4 hours. May need to put some more water into the tray.

5) Enjoy!


5/2/07

Software - MS Trips & Streets

Importing Data into MS Streets & Trips 2007 (S&T07)

Starting here:
Link to Databases & Instructions

This will lead you to the website for the download files:
Download

1. For Microsoft readable text files scroll to the far right of the screen.
2. click on the file you need and save it to a folder on your hard drive
3. un-zip the file
4. open S&T07 and go to DATA – IMPORT WIZARD in the top menu
5. point to the ‘un-zipped’ file (here I am using the Super WalMart Centers)


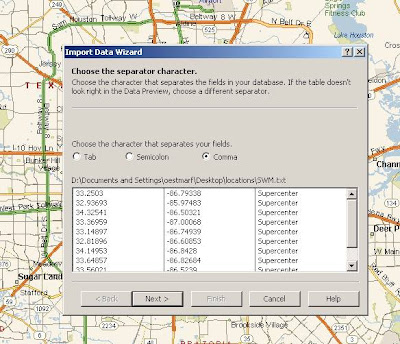
6. Make sure you do a ‘comma’ separate import – click NEXT
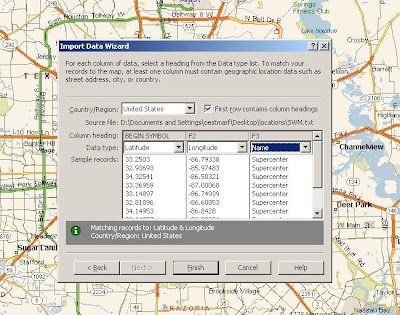
7. Under DATA TYPES use ‘Latitude’ in the first, ‘Longitude’ in the second and ‘Name’ in the third row.


8. Click FINISH.
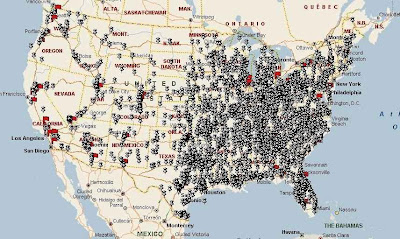
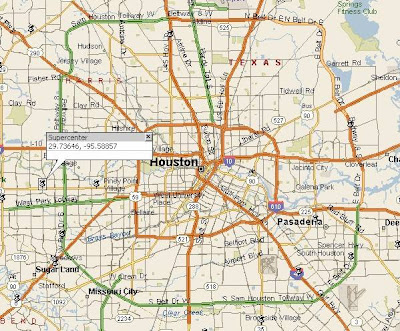
9. We have a lot of WalMart Super Centers….


10. You notice that the locations are marked with a black pushpin. This is the ‘default’ setting.


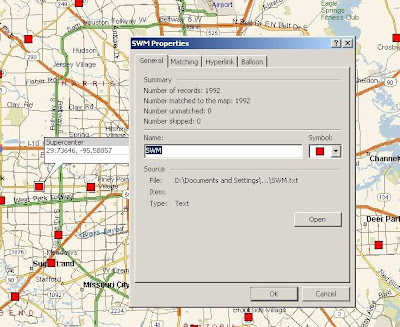
If you want to change this do the following steps:

11. Click on DATA – DATASET PROPERTIES in top menu
12. Select the just imported dataset (WalMart Supercenters = SWM), here you can see my new selection


13. Have Fun!

Software - MS Trips & Streets

This is a summary of a post that I had on another website:
RV Forum Post

quote...

I am not a big MS fan but this seems to be a good alternative to the various hardware GPS systems out there. Has anyone experience with this device/software? Pro's & Con's?

Should I stay away from something that requires a Laptop to run?

Where and how did you secure your Laptop for easy mounting and un-mounting when parked?

Where does the power come from for the LapTop GPS solutions? Are they powered through USB or is an external power (12V) needed?

SUMMARY FROM POSTS (I will add as we go...)

PROs

It works (dreamer)
larger screen (depends on Laptop but usually true)
cost (< $100 if you have Laptop)
can be combined with any GPS
allows for route pre-planning at home, this allows for a more scenic route
allows downloads for specific locations (WalMart, Camping World, ...)
has background tools that allow customizing, has night/day features for brightness
keeps DW happy and occupied!

CONs

mounting more difficult, especially in TV
no automated adjustment of screen brightness depending on day, night, sun, ... (Laptop's can be manually dimmed too)
no touch screen (unless this is purchased separately)
mistakes Burger King's with Animal hospitals (is this wishful thinking?)
routing questionable with regards to bridges, ferries, ...
this is not a 'hiking option'
Laptop in car might be easier target for thief's than a regular mounted GPS
Laptop is used only on the long trips, GPS system is always in the car - so it helps you out on a daily basis as well


Verdict so far - most posts like it!

...quote

I have been using it now for a couple of month and I am happy with this software. It has great support (non Microsoft) out there and 3rd party developer make this software more useful (--> Keys, check out the link under 'cudos').
Marvin Hlavac on the GPS Forum

4/23/07

Truck_Puter: Cudos

At this point I like to give a big cudos to the endless tips from the internet.

just make sure you read and search before you post questions.

Check out:
- Anything can be found here
- Marvin Hlavac on the GPS Forum
- RoadRunner Installer
- RoadRunner

Truck_Puter: Putting it all together #2

Between last and this weekend I did build a nice monitor stand. I used PVC pipe that I glued together and fixed to the center console. Then I spray painted it in a interior color of the Truck (on the picture it look much lighter than in reality).

Tip: I used 45 deg angle bends, if you use a bunch of them you can have the arm go in all directions and always end up with a flat top surface.

It took me some machining of solid plastic to build a similar receicer to the screen swivel than the original table stand.


The I ran a video cable (2 video, 1 audio) to the back of the car by using the cabl;e channels underneath the door steps. Once I came to the back I used a hole to go to the outside. I cut a hole in an elastomeric plug. Make sure you seal the hole afterwards with some silicone.


I had to lower the license plate to get a camera high enough to see anything. The metal strips are for this purpose. You can also see a little electrical water tight box that I use to make connections to the cable/camera (this is not for the trailor).


Full setup with camera installed:


And here the result with a picture of my lovely driveway!

4/22/07

Truck_Puter: Putting it all together...

Alright - I started last weekend to put everything together. I disassembled the center console and placed my 'fit 4 purpose' docking station in there. I cut holes to allow access to the ports of the docking station.


I ran all cables underneath the carpet to the center console. With the laptop here I can always pull it out and take it with me. It fits very nicely in there.


You notice the flat white cable running out of the box - this is the on/off & undock button from the docking station. I cut this on off to gain access to the on button without opening the laptop (does not work to to space constrains). I still need to find a good place for it.

4/13/07

Truck_Puter: Update

I have played with RoadRunner and I like FrodoPlayer better. In the meantime I have destroyed (cosmetic surgery) my docking station for the C400. I did cut off some side pieces so it will fit nicely into my box between the two front seats. I have now also tested the setup at home and everything works fine.

Tomorrow I will route the cables in the car underneath the carpet and will figure out the best mounting for the touch screen. I am still thinking about PVC pipe that is spray painted in the cars color scheme....

I will post pictures here as soon as I start getting everything into the truck.

4/8/07

Truck_Puter: The Software

I played around with two different front end computer software over the long Easter Weekend.

1) FrodoPlayer
2) RoadRunner

Both are freely available on the net. I choose to go deeper with the FrodoPlayer as I understood quickly the skinning technique. I created a skin for the player that follows the color scheme of the interior of the Truck. My work with FrodoPlayer was extensive but this will not exclude Roadrunner later. I just hope I find a good way to include easyly the Microsoft GPS software.

Here is the latest skin:

4/6/07

Truck_Puter: The Beginning

Long ago when we bought our travel trailer I had the idea to include a backup camera system into our trailer and the tow vehicle. This idea was extended when I got Microsoft Streets & Trips for Christmas. Now I had to face two problems:

- display a standard NTSC or PAL video feed from the camera(s)
- display a computer screen from the GPS system
- provide interface to interact with the GPS system
- one “nice to have” that I am thinking about to include in the future: OBD-II car diagnostics

After a while of searching and reading up on the internet I decided to go with a Laptop as my base system. The advantages from a Laptop are very easy to understand:

+ designed for low power consumption
+ low noise emission
+ battery (for delayed shut down if needed)
+ comes with monitor and keyboard already attached
+ small ‘real estate’

(nice discussion on this topic)

The problem is that you don’t want to display a laptop all the time on your dashboard as it attracts thieves. Yet another problem is that the Laptop is not necessarily equipped to display video feed. You would need a tuner card or a video recorder card to get this displayed but there might be a time delay in video display when doing so. At this point I decided to not go the route of displaying video on a Laptop. For the added security I decided to go with an external touch screen monitor so the Laptop could be tugged away out of sight. The touch screen also allows the main interface functions with the laptop/software/GPS system.


Now the fun part started – looking for components. I am still in the process of sourcing some parts but I have the concept and main parts on hand. Here is a list with parts (all from ebay):

1) Dell Latitude C400 (very small) // about US$180 on eBay with official Win XP-Pro, Wireless card, 20 GB HD, 512 MB Ram, etc


2) VM84 - 8.4" 8" TFT LCD touch screen // about US$140, native resolution 800x600, 2 RCA video inputs, 1 audio input


3) Backup Camera // about US$40, 0 Lux infrared night vision, reverse color image, 2.8mm, 120 deg view


4) 2nd camera for Travel Trailer, preferred with audio, still looking


Here is a basic set up as its planned.